|
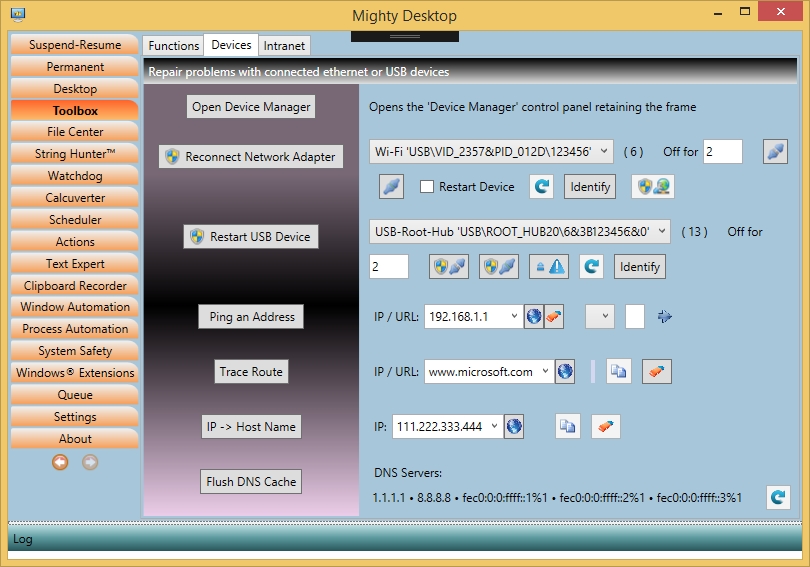
The Devices tab (of the tab 'Toolbox') provides these functions:

-
Open Device Manager: Opens the 'Device Manager' control panel of Windows. Other than in Windows its window frame is retained. In some circumstances administrator mode is necessary (maybe a security measure). Hold [Ctrl] to start the Device Manager in administrator mode. As a bonus, if you use this function on a non-admin user account the first warning dialog box with the hint of not being able to change anything is automatically closed.
- Reconnect Network Adapter: Disconnects one of the network adapters in the Network Control Panel for any period of time and reactivates it. This can be used to fix a permanently disconnected WiFi, to cure line problems and also to augment security. For example you could disconnect it before you go to dinner and your computer will be safe from hacking. You can also just use the buttons to disconnect and reconnect manually anytime. By the way, a pending reconnect will not be canceled when you quit Mighty Desktop, it will just continue if you start it the next time.
- Identify: Many times it's complicated to find out the name of a network adapter because they are the same for many devices. The method behind this button is that you just manually disconnect the device and Mighty Desktop will tell you the name of the disconnected adapter. Easier than scanning through lists by eye.
- Repair Network button: If you have problems with the network this button will execute some standard low-level commands like IP releasing and renewing aso. It follows the recipe recommended by Microsoft. Tip: If a network adapter doesn't want to work even after a reboot it can be the result of a misconfiguration inside Windows. If you had it successfully running some days before try to reset your Windows to a previous Windows Restore Point. There is no loss of personal files. We had good results with this in our long carreer.
- Restart USB Device: Allows you to repair a crashed driver of a USB device without unplugging and replugging. Especially useful when you can't physically access the device. As a side gain this can be used to augment security. For example you could disconnect the USB device while you were going to dinner and it would be safe against being read out.
- USB-Devices dropdown: Note that USB Network Adapters are not listed here but in the Network dropdown further above. The tooltip will show the Serial Number of the device, the Plug&Play id of the device and also an error message when it reports an error. If the USB port is connected to a disk it will also show the disk's Plug&Play id and all the volumes that it has mounted currently.
- Disconnect and Reconnect: You can use these buttons to disconnect and reconnect a drive manually anytime. It will require admin rights and is not recommended because data could be lost. Be informed that there is also a Mighty Command that can do a safe eject. With it you could for example configure that a backup of something is run and then the drive is ejected. This would keep the drive safe from virus attacks and at the same time save power.
- Eject: This button is an improvement of the "Safe Eject" button in the Windows Task Bar. It can tell you exactly what the cause is if the eject of a removable drive doesn't succeed. It will then automatically scan the system and find out which process has files open on it and you have the option to close or kill the process. This function can also be executed directly in File Explorer by right-clicking on the drive's icon (see Explorer Integration tab).
- Identify: Many times it's complicated to find out the name of a USB device because they are the same for many devices. The method behind this button is that you just manually disconnect the device and Mighty Desktop will tell you the name of the disconnected device. Easier than scanning through lists by eye.
- Ping an Address: A small info package is repeatedly sent to this web address which will tell you whether there is a device listening. A special feature is that it will not stop pinging for a configurable duration until you stop it manually. This allows a system admin to work on the firewall or destination computer until the ping is answered and then Mighty Desktop will execute the configured action. The action could for example be to send an email to the admin's phone. Note that if you ping a local device and you labeled it in the 'Intranet' tab you will get not only the name but also its label.
- Trace Route: Sends a small info package to a web address and lists which other servers are visited in between. It uses the system's internal program 'tracert.exe'. But here you can enter a full URL including protocol and sub-path (" http://../x/y "). You can configure the commandline used for doing the trace in the 'Settings' tab which allows to increase the number of hops, time limits, change the IP version aso. if necessary.
- IP -> Host Name: It will ask the device listening on a local intranet IP what its name is (so called Reverse-Lookup). If you labeled that device in the 'Intranet' tab you will not only see its name but also its label.
- Clear DNS Cache: The PC knows one special IP where to ask what IP is assigned to a name you enter in the browser. You can see this IP by the button 'Info' in the 'Intranet' tab, listed as 'DNS Server'. This button here will ask this server to clear it's cache. This can resolve problems during the installation of networks when IPs or names of computers were changed.
|